Up until now we’ve only been using BMP images as they’re the only type supported by the base SDL library, but being restricted to using BMP images isn’t that great. Fortunately there are a set of SDL extension libraries that add useful features to SDL, such as support for a wide variety of image types through SDL_image. The other available libraries are SDL_ttf which provides TTF rendering support, SDL_net which provides low level networking and SDL_mixer which provides multi-channel audio playback.
Installing an Extension Library
In this lesson we’ll just need SDL_image but the installation process for all the extension libraries is the same. Download the development library for your system from the project page and follow the instructions below to get SDL_image set up on your system.
Windows (MinGW or Visual Studio): Merge the extension library’s files into your existing SDL2 directory. You’ll also need to copy the SDL2_image, zlib and any image format dlls (such as libpng) over to your executable directory so that they’re available at runtime
Linux: Install from your package manager or by downloading the source and building with CMake.
Mac: Download the .dmg from the site and follow the Readme.
To use the libraries you’ll need to update your includes and build system to link against the new extension library.
Cmake
Grab the appropriate module from the repo
and add it to your CMake modules directory (cmake/). You can then look up the new extension library using the same
find_package method used to find SDL2 and include SDL_image.h in your source file.
find_package(SDL2_image REQUIRED)
include_directories(${SDL2_IMAGE_INCLUDE_DIR})
# Link this lesson against SDL2 and SDL2_image
add_executable(Lesson3 src/main.cpp)
target_link_libraries(Lesson3 ${SDL2_LIBRARY} ${SDL2_IMAGE_LIBRARY})
# Install target is the same as before
Visual Studio
Include SDL_image.h and add SDL2_image.lib to your linker dependencies.
GCC or Clang on Linux and MinGW on Windows
Include SDL2/SDL_image.h and add -lSDL2_image to the SDLLIB variable in your makefile.
Clang on Mac
Include SDL2_image/SDL_image.h and add -framework SDL2_image to the SDL variable in your makefile.
Setting up Tile Properties
In this lesson we’ll see how to load images with SDL_image along with looking into scaling our textures when they’re drawn and come up with a method to place tiles based on the window size and the tile size. To do this we’ll need to define a tile size constant, which we’ll add below our window constants.
const int SCREEN_WIDTH  = 640;
const int SCREEN_HEIGHT = 480;
//We'll just be using square tiles for now
const int TILE_SIZE = 40;
Loading Textures with SDL_image
SDL_image lets us load multiple types of images along with allowing us to load them directly to an SDL_Texture
with IMG_LoadTexture. With this function almost all of our loadTexture code can be replaced and now
we call IMG_LoadTexture to load the texture, check for errors and return.
We can still use logSDLError to log errors from the SDL_image library as the IMG_GetError function is just a define of SDL_GetError.
/**
* Loads an image into a texture on the rendering device
* @param file The image file to load
* @param ren The renderer to load the texture onto
* @return the loaded texture, or nullptr if something went wrong.
*/
SDL_Texture* loadTexture(const std::string &file, SDL_Renderer *ren){
	SDL_Texture *texture = IMG_LoadTexture(ren, file.c_str());
	if (texture == nullptr){
		logSDLError(std::cout, "LoadTexture");
	}
	return texture;
}
Specifying Width and Height for Rendering
With SDL2 we’re able to scale textures when they’re rendered by specifying a width and height for the
destination rectangle that differ from the texture’s width and height. However it’s also common to
draw the textures without any scaling applied and it’d be a real pain if we had to specify the width
and height each time we wanted to draw without scaling.
To get around this we’ll create two versions of renderTexture.
One will take the width and height along with the other parameters while another version will mirror our original
and will use the texture’s width and height for the destination.
To set the texture’s width and height for drawing we simply write the width and height we want to the destination rect’s width and height fields instead of getting them from the texture.
/**
* Draw an SDL_Texture to an SDL_Renderer at position x, y, with some desired
* width and height
* @param tex The source texture we want to draw
* @param ren The renderer we want to draw to
* @param x The x coordinate to draw to
* @param y The y coordinate to draw to
* @param w The width of the texture to draw
* @param h The height of the texture to draw
*/
void renderTexture(SDL_Texture *tex, SDL_Renderer *ren, int x, int y, int w, int h){
	//Setup the destination rectangle to be at the position we want
	SDL_Rect dst;
	dst.x = x;
	dst.y = y;
	dst.w = w;
	dst.h = h;
	SDL_RenderCopy(ren, tex, NULL, &dst);
}
We’ll also create a function that provides the old functionality of drawing the texture without any scaling. This
function will just get the width and height from the texture then call our new renderTexture function.
/**
* Draw an SDL_Texture to an SDL_Renderer at position x, y, preserving
* the texture's width and height
* @param tex The source texture we want to draw
* @param ren The renderer we want to draw to
* @param x The x coordinate to draw to
* @param y The y coordinate to draw to
*/
void renderTexture(SDL_Texture *tex, SDL_Renderer *ren, int x, int y){
	int w, h;
	SDL_QueryTexture(tex, NULL, NULL, &w, &h);
	renderTexture(tex, ren, x, y, w, h);
}
Initialize SDL_image (Optional)
When loading an image for the first time SDL_image will automatically initialize the necessary image loading
subsystem, however this will cause some delay in loading the image since SDL_image will have to perform
its initialization setup first. If you’d like to initialize SDL_image earlier
to avoid the delay when loading an image type for the first time you can do so with
IMG_Init. IMG_Init will return
a bitmask of all the currently initialized image loaders, so we’ll perform an and with the flags we passed
to see if initialization was successful. Here we only initialize the PNG loader since that’s all we’ll need for this lesson. This initialization should be done after initializing SDL.
if ((IMG_Init(IMG_INIT_PNG) & IMG_INIT_PNG) != IMG_INIT_PNG){
	logSDLError(std::cout, "IMG_Init");
	SDL_Quit();
	return 1;
}
We then open a window and renderer the same as we did in lesson 2.
Loading the Textures
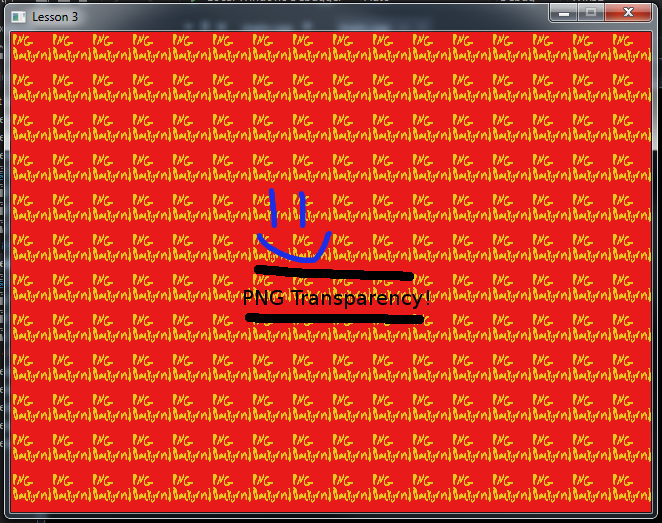
Since this lesson is to demonstrate loading PNGs we’ll be using new images for our background and foreground. We’ll also demonstrate that PNG transparency is preserved by using a foreground image with a transparent background drawn on top of a tiled background. Grab them both below.


The images are loaded exactly the same with our loadTexture function. Be sure to update the file paths to match
your project structure.
const std::string resPath = getResourcePath("Lesson3");
SDL_Texture *background = loadTexture(resPath + "background.png", renderer);
SDL_Texture *image = loadTexture(resPath + "image.png", renderer);
//Make sure they both loaded ok
if (background == nullptr || image == nullptr){
	cleanup(background, image, renderer, window);
	IMG_Quit();
	SDL_Quit();
	return 1;
}
Tiling the Background
Since our tiles are much smaller now we’ll need a lot more than 4 to cover the entire screen and typing their positions out by hand would be a real pain. Instead let’s generate the tile draw positions to fill the screen by using some math!
We can determine how many tiles each row will need by dividing the SCREEN_WIDTH by the TILE_SIZE. To determine
the number of tiles per column we can do the same thing but for the SCREEN_HEIGHT. Since we’ll be filling a square
area of tiles the total number of tiles will be tiles_per_row * tiles_per_col. We could use a single for
loop to run through all the tiles, or nested for loops to fill each tile in a row for each row. I’ve chosen to go with a single loop.
In the loop we compute the x and y indices of the tile to determine where it should be placed. Since we’re drawing
row by row in this method the x index will repeat each row, while the y index will increment after each row is filled
and we move down to the next row.
Thus we can calculate the x index using the absolute tile index modded with the number of tiles per row:
x = tile_idx % tiles_per_row.
For example, if we were drawing a 2x2 grid of tiles we’d expect tile 0 to have the same x index as tile 2, which with this method it will: 0 % 2 == 0 and 2 % 2 == 0.
The y index should increase after an entire row of tiles has been placed, so every tiles_per_row tiles. Since we’re using integers
we can take advantage of integer truncation and compute this as y = tile_idx / tiles_per_row. So on our 2x2
grid example: row 0 will have tiles 0 and 1: 0/2 == 0 and 1/2 == 0,
and row 1 will have tiles 2 and 3: 2/2 == 1 and 3/2 == 1 giving the correct y indices.
All that’s left to do is convert the indices into the pixel coordinates of the tile, which is done by multiplying the x and y indices by the tile size, and our tiling loop is done!
Note: All of this rendering code will be placed within our main loop, similar to lesson 1.
//Determine how many tiles we'll need to fill the screen
int xTiles = SCREEN_WIDTH / TILE_SIZE;
int yTiles = SCREEN_HEIGHT / TILE_SIZE;

//Draw the tiles by calculating their positions
for (int i = 0; i < xTiles * yTiles; ++i){
	int x = i % xTiles;
	int y = i / xTiles;
	renderTexture(background, renderer, x * TILE_SIZE, y * TILE_SIZE, TILE_SIZE,
		TILE_SIZE);
}
Drawing the Foreground
Our foreground image is drawn the same as before, centered in the screen.
int iW, iH;
SDL_QueryTexture(image, NULL, NULL, &iW, &iH);
int x = SCREEN_WIDTH / 2 - iW / 2;
int y = SCREEN_HEIGHT / 2 - iH / 2;
renderTexture(image, renderer, x, y);
We’ll then present the renderer and wait a few seconds before exiting just as we did in Lesson 2.
SDL_RenderPresent(renderer);
SDL_Delay(2000);
Cleaning Up
Clean up is the same as in lesson 2 with one added line to quit SDL_image by calling
IMG_Quit.
cleanup(background, image, renderer, window);
IMG_Quit();
SDL_Quit();
End of Lesson
If everything went well you should see this draw to your window.
If you have any issues check your error log and check back through the lesson. Feel free to send an email or tweet for any questions you may have.
I’ll see you again soon in Lesson 4: Handling Events!